When I found out that Radio Shack was declaring bankruptcy and closing down half of their stores, I naturally started visiting the stores on the closing list to see what was on clearance. Luckily, the closest store to my house is not closing, but nearly every other one within driving range is shutting their doors.
So I have been slowly buying tons of component parts and Arduino accessories to have on hand for future projects. Since they started selling Makeblock kits, I have had my eye on them, but at $179 for the cheapest kit, I was a bit hesitant to buy anything. But when the kits went on clearance, I snagged one of their Bluetooth tank robot kits for $60 and just got it set up.
I ran into a few issues and resolved them, so I thought sharing the solutions might be useful to someone else.
First off, here are the online instructions I followed - these are in addition to the ones included in the box:
http://learn.makeblock.cc/starter-robot-kit-ir/
Issues building the frame
1. The first issue I ran into was not really a problem, but could be difficult for some. There are 2 wheels that are intended to spin freely and 2 that will have motors attached to them. The motor wheels are easy to assemble, but the 2 other wheels require mounting bearings into the hub of the wheel and a small axle to go through the bearings. I had to use a hammer on the concrete floor to gently tap the axle through the bearings as they were somewhat difficult to get through. Be careful that you don't bend the axle or damage the bearings, as they need to be able to spin without friction.
2. The second issue that I ran into was also not a problem so much a warning so you won't be confused. The tank tracks in my kit were a bit too long when I assembled them and put them over the wheels. I had to remove 2 track sections from each side to get them to fit snugly.
I then realized that I previously bought the MAKEBLOCK MEDIUM BEAM0824 ROBOT PACK from Radio Shack on clearance (I think I got it for $15), so I decided to use some of the longer beams than the ones that came with the tank kit and utilize all of the tank track pieces. I also used a longer crossbar piece to connect the two tank tracks together, thereby making the whole tank larger.
Issues with the software
I ran into an issue that I found multiple people complain about online but no one offering a solution.
If you bought the Bluetooth version of the robot and are trying to use the MakeBlock Android app to connect to your robot, you might get a message after pairing your phone to the bluetooth module that you need a firmware update. It will give you an option to do so from the app, but this did not work for me. On the first try, it stalled after about 40%. Second try, it got all the way to 80%. Third try it reached 100%, but then still told me to update firmware. Restarted the app and tried again, no dice.
So, being that the included board is just a modified Arduino, I decided to connect it to my computer and upload the firmware manually. This is the recommended solution, but there are a few caveats.
The board that came with my kit was called the Makeblock Orion board. While I found one site that said this was an Arduino Leonardo, it turns out that it is actually an Arduino Uno, so you will need to choose the Uno from the Arduino IDE board settings menu.
You will also have to download the makeblock firmware library here:
https://github.com/Makeblock-official/Makeblock-Firmware/tree/master/firmware
Then extract it to your Arduino Libraries folder to be able to access it from the Examples menu in the Arduino IDE (restart IDE if it was open before you copied the library).
The actual file you will need to upload to your Makeblock Orion (Arduino Uno) board is called firmware.ino:
https://github.com/Makeblock-official/Makeblock-Firmware/blob/master/firmware/firmware.ino
Now you can upload to the board (unplug the bluetooth module during upload, then plug it back in before trying to pair with your phone).
After that, I restarted my phone app and was able to pair with my phone and control the robot.
One last note: if either motor is spinning in reverse, you can unplug that motor and reverse the wires - then plug it back in and you should be good to go.
Summary:
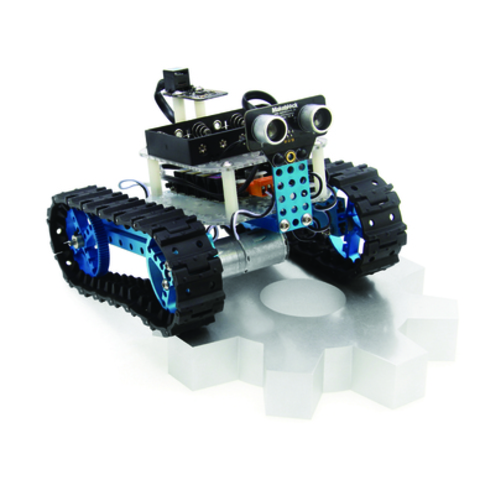
This is a very neat kit for anyone wanting an all-in-one robot that can be assembled without any soldering or cutting. It even comes with all of the tools required to assemble it. The parts are all very high quality aluminum and the tank tracks are actually made of rubber and drive nicely even on wood floors and tile without slipping (I thought from the picture that they would be plastic).
You can also configure the frame to be a 3 wheeled version instead of using the tank tracks, but you would likely have to be crazy to not use the awesome tank tracks - just my opinion. Lastly, don't worry if you have extra parts after assembly, they give you quite a few extra screws, and other varioius parts.
Update:
Here are some links to the new code. I haven't tried this code for either the IR or Bluetooth versions, but I noticed that the Makeblock team reorganized the code for the firmware and examples to be in the same Github repository and they more clearly named the IR and Bluetooth sketches as such (when I wrote this post, there was no Bluetooth code, you just uploaded the firmware).
I will test it out, but in the meantime here is a link to the main repository:
https://github.com/Makeblock-official/Makeblock-Libraries
And the directory that has the two options for IR or Bluetooth is here:
Note:
The Bluetooth example code in the new repo appears to just be the Orion firmware with the IR piece removed. The IR example code seems to just be the Orion firmware wiht the Gyro piece removed and the sensors hard-coded (ultrasonic sensor to port 3 and IR sensor to port 6).